Also called the pot-in-pot refrigerator, the zeer system is a simple but important technology. It is easy to make at home and will help preserve food and drink in hot weather without needing electricity. (h/t to TheHomesteadingHippy.com)
To make a zeer pot, get two clay pots with solid bottoms that are big enough to hold food. One of them must be at least two inches bigger in diameter than the other.
Next, get insulating materials (dirt, sand, and vermiculite will work), burlap or cotton, and a potting tray. Keep some watertight materials on hand.
Look for a balcony, breezeway, corridor, or another place that gets steady airflow. Put the potting tray down on the flat surface and set the larger pot on it. Plug any holes with the watertight material and seal the edges.
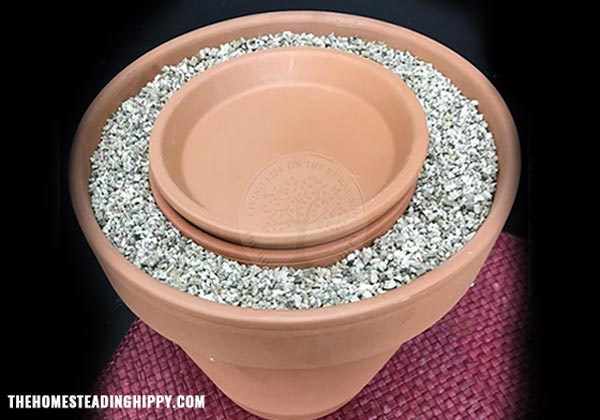
Pour insulating material over the bottom of the large pot. Add enough so that when the smaller container gets set on top of the insulation, its top rim is level with that of the larger one.
Make sure to center the smaller pot inside the larger one. From above, it will look like a bull's eye. (Related: Food storage tips: Considerations for making the most out of your food prepping budget.)
How to make a zeer pot for keeping food cool and fresh
Fill the space between the two pots with insulating material. Do this slowly to avoid spilling anything into the inner pot.
Level the insulation material and top it off. The filled gap will insulate the inner pot from the temperatures outside the outer container.
Next, carefully pour water into the insulating layer. Fill it to the brim but make sure it doesn't leak into the inner pot.
Filter any water drawn from outside sources like streams and ponds. Use colder water to speed up the cooling process.
Inspect the pots for any leaks. Patch these with watertight fillers. The potting tray set beneath the zeer system will catch leaking water and substrates.
The pot-in-pot system is now ready for use. The homesteader may store either plant-based produce or meats in it. It works best for foods with natural peels or dry foods.
To keep fruits and vegetables from leaking or mixing, wrap each item or devote a zeer system for each fruit or veggie.
Keep meats in their dedicated pot. If you need to store them with plant produce, wrap the meat with cellophane.
Cloth-based covers and clay lids
After filling the zeer pot, cover it with a section of woven cloth. Use burlap, cheesecloth, cotton, and rags, but avoid polyesters and other artificial fabrics.
Start by soaking the fabric in clean water. Wring it dry before gently draping the cloth over the pot-in-pot system.
In windy areas, secure the cover with cordage. Add as many layers as needed, but make sure enough air passes through the stacked cloth.
When the rags dry out, change them. For multi-layered covers, remove the top layer, soak it, and move it to the bottom.
Homesteaders may also place a clay lid on the inner pot. In this case, the cooling effect of evaporation comes from the outer insulation layer.
A clay lid works just as well as the cloth-based approach. Not only does it keep the food cold and intrusive water out, but the sturdier cover also protects against pests and animals.
Keep an eye on the zeer pot, especially on hot and dry days. Replace and moisten the rags.
Don't forget to refill the insulating layer. To measure the water level, stick a small tube into the insulation and peer inside it, or touch the surface of the material to check its moistness.
Check out Homesteading.news for more tips on storing food without refrigeration and other food storage techniques.
Sources include:
Please contact us for more information.


